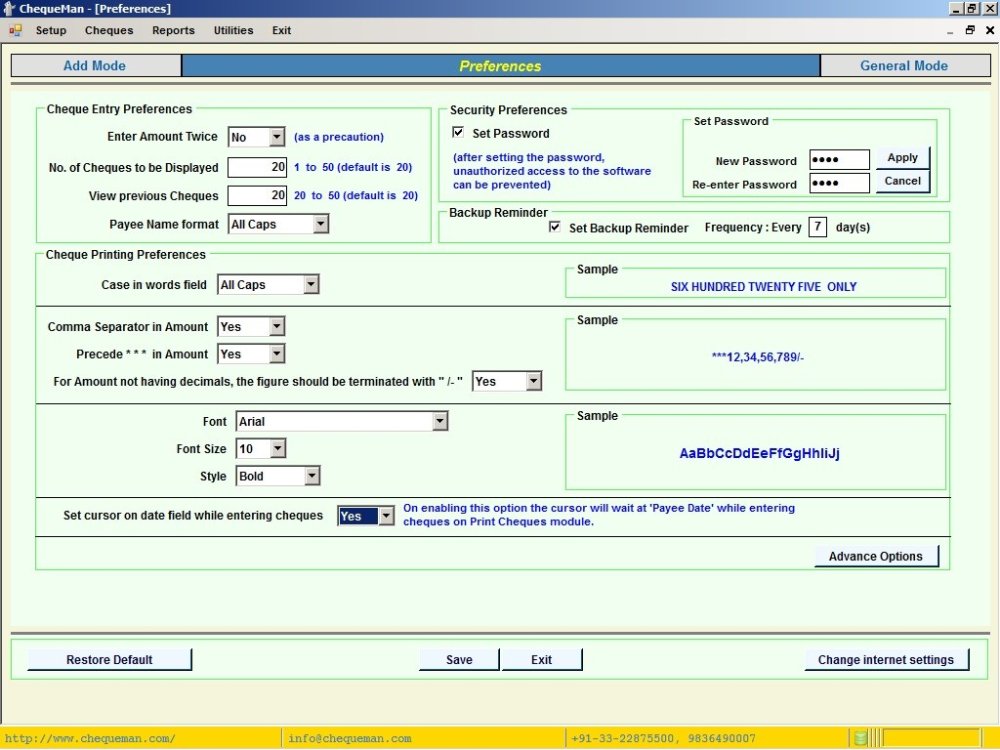
In the Menu, select . This will take you to the following interface:
Through this module, one will be able to set up the printing of cheques and other parameters as per one’s own preference. This covers the following:
Cheque Entry Preferences :
Enter Amount Twice : On selection, it would be mandatory to enter the cheque amount twice in the Cheque entry grid, helping in the cross check of the amount.
No. of Cheques to be displayed : This shows the default number of cheques that will be displayed in the entry screen. This can be changed to a maximum of 50.
View previous Cheques : This shows the number of previously issued cheques that will be displayed in the cheque entry module. This is set to 20 and can be changed to a maximum of 50.
Payee Name Format : This decides the format of Payee Name getting printed in the cheque. One can select ‘ALL CAPS’ to print the name in capital letters or ‘As Entered’ to print the name in the same case as entered.
Case in Words fields : This decides the format of Amount in words getting printed in the cheque. One can select ‘ALL CAPS’ to print the amount in capital letters or ‘Proper’ to print the amount in the format in which first letter of the word is capital and the rest is small.
Comma Separator in Amount : By selecting YES, the amount field will have comma separators.
Precede *** in Amount : By selecting YES, the amount will be preceded by ***. Example 3455.00 will be displayed as ***3455.00.
For Amount not having decimal, the figure should be terminated as ‘/-‘ : For amounts with nil paisa, one can opt to print either as 3455.00 or as 3455/-.Font, Font Size & Style : One can select the Font, Size and Style of printing on cheques as per one’s preference and liking.
Password : As an option, one can set the password. Every time you start the software, you will get access only after providing the correct password credentials. This password may also be removed as and when required.
Advanced Options : This contains the following optional features:
- Printing ‘NOT OVER Rs.’ on cheques. If opted for, the Not Over amount will be rounded off to the following Rupee. For example if Cheque Amount is 2344.45, the ‘Not Over’ Amount is 2345.00.
- Printing of Incomplete Cheques – Only on selection of this feature, the software will permit the printing of Incomplete Cheques. In incomplete cheques module one can print the cheque in which one or more parameters printed in the cheque can be left blank. Once opted, this feature gets listed in the ‘Cheques’ menu.
- Printing of Rubber Stamp – Some banks requires rubber stamp to be affixed on cheques along with the signature. For enabling the feature of printing the ‘Rubber Stamp’ on cheques, select . Once enabled, this can be implemented through the Account Setup, Cheque Design Template and Cheque Book setup.
- Printing of Account Number – There are still some banks that requires Account No. of the Payer (A/c Holder) to be printed on cheque leaves. Enable this feature through this option. Once enabled, this can be implemented through Cheque Design Template and Cheque Book Setup
- Clearing of Cheques – By enabling this feature, one can keep track of cleared cheques / pending for clearing. Once opted, this feature gets listed in the ‘Cheques’ menu.
- Payee Groups – Once enabled, the system allows grouping ‘Payees’ into groups. Basically, it is for reporting purposes, wherein all cheque issues to a ‘Group’ can be clubbed in a single report. Once opted, this feature gets listed in the ‘Setup’ & ‘Reports’ menu.
- Date Validation – By default, any valid date is accepted while preparing cheques. One can activate date validation and provide start & end dates. Further, one may opt to prevent preparing cheques outside the date range or alternatively, only to get a warning.
- Deletion of Account Holders / Bank Accounts – Normally, there is no deletion facility once a cheque is prepared through the software. The facility of removing an ‘Account Holder’ completely or a particular ‘Bank Account’ of an Account Holder (with all its transactions) can be enabled here. Once opted, this feature gets listed in the ‘Utilities’ menu.
Need more help with this?
ChequeMan - Support


